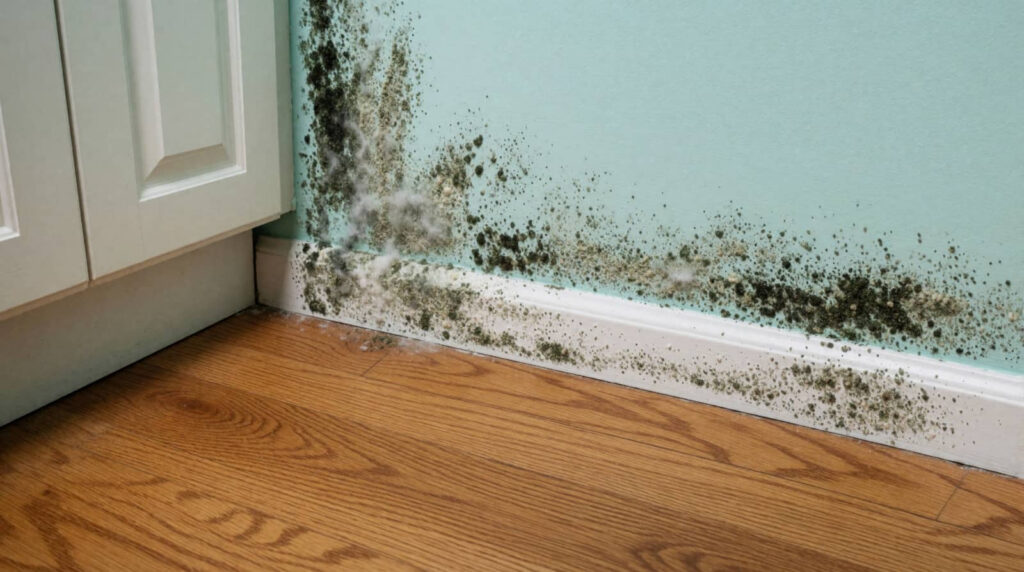
After moisture damage, you need to act fast because mold can start growing within 24 to 48 hours. If you leave damp materials in place, you raise the risk of hidden contamination, air quality problems, and costly repairs. You can reduce that risk by finding the water source, drying affected areas, and checking vulnerable surfaces before the problem spreads. The key question is how much damage has already started. Here’s why it’s so important to prevent mold after moisture damage and how to do it.
Key Takeaways: Why Prevent Mold After Moisture Damage
- Mold can start growing within 24 to 48 hours after moisture damage, so quick drying prevents fast spread.
- Preventing mold protects indoor air quality and reduces health risks like allergies, asthma, and respiratory irritation.
- Stopping moisture sources and improving ventilation helps keep materials dry and blocks future mold growth.
- Early cleanup limits damage to drywall, insulation, carpets, and other porous materials that trap moisture.
- Prompt action reduces repair costs and may prevent the need for professional mold removal later.
How Fast Does Mold Grow After Water Damage?
Mold can begin growing within 24 to 48 hours after water damage if the affected materials stay damp. You need to track the mold growth timeline closely, because spores can colonize drywall, carpet, and wood fast.
Warm air and high humidity levels speed up this process, especially in closed rooms with poor airflow. If you’re part of a team restoring a space, act as soon as you spot staining, warping, or a musty odor.
Drying time matters, but so does surface type; porous materials absorb moisture and support growth sooner than sealed ones. You can reduce risk by checking hidden areas, including baseboards and behind furniture.
Quick action helps you protect your space and keep your people safe.
Stop Moisture Damage Before Mold Starts
To keep moisture from turning into mold, you need to stop the source fast and dry affected materials right away. Check plumbing, roofs, windows, and appliances for leaks, then shut off water or patch failures before damage spreads.
Use moisture detection tools to find hidden wet spots in walls, flooring, and insulation, because you can’t fix what you can’t see. Document the affected areas, isolate them if needed, and remove soaked items that can’t be saved.
Your prevention strategies should include routine inspections, good ventilation, and quick response after spills or storms. When you act early, you protect your space, reduce repair costs, and keep your home safer for everyone who lives there.
Dry Out Wet Areas the Right Way
First, stop the moisture at the source so wet materials don’t keep absorbing water.
Then increase air circulation with fans and open pathways to speed evaporation.
Use safe drying tools, such as dehumidifiers and controlled heat, to dry the area without spreading contamination.
Stop Moisture at Source
Before you dry anything out, stop the water at its source; otherwise, the damage keeps spreading and mold can return fast. You need to inspect plumbing, roofs, windows, appliances, and drainage for active leaks, then shut off supply lines or make temporary repairs right away.
If you belong to the group handling cleanup, document every moisture source so no issue gets missed. Use prevention techniques like replacing failed seals, tightening fittings, and redirecting runoff away from the structure.
Remove soaked materials only after the source is controlled, because wet framing and insulation can keep feeding growth. You’ll protect your space, your team, and everyone who uses the building when you act fast, verify dry conditions, and confirm the area stays stable before moving on.
Increase Air Circulation
Open up the space and push fresh air through it so moisture doesn’t linger in hidden materials.
You should create cross-breezes by opening opposite windows and interior doors, then keep pathways clear so air can move freely through the room.
Use airflow techniques that target damp corners, closets, and wall edges where stagnant pockets form.
If the building allows it, run exhaust fans in bathrooms and kitchens to move humid air outside.
Position supply vents and return grilles so they’re unobstructed, and don’t block vents with furniture or stored items.
These ventilation solutions help wet surfaces dry faster and reduce the time mold has to settle in.
You’re not just drying a room—you’re protecting your space, your routine, and everyone who belongs there.
Use Safe Drying Tools
Use the right drying equipment to pull moisture out of materials quickly and safely. You should place a commercial dehumidifier in the affected area and keep doors closed so it can work efficiently.
The dehumidifier benefits you by lowering humidity, which slows mold growth and helps walls, floors, and contents dry at a steady rate. Use fans to move air across surfaces, but don’t aim them at visible mold.
Check progress with moisture sensors so you know when materials have reached safe levels. Replace wet insulation, carpet pad, and heavily soaked drywall if they won’t dry within 24 to 48 hours.
When you use the right tools, you protect your space and help your team restore it with confidence.
Remove Porous Materials That Hold Mold
You need to identify porous materials like drywall, insulation, and ceiling tiles that can trap mold after moisture damage.
Remove any damaged drywall that’s swollen, crumbling, or visibly contaminated, since drying alone won’t make it safe.
Replace contaminated insulation, because it can hold spores and keep moisture problems active.
Identify Porous Materials
Porous materials act like sponges after moisture damage, trapping water and supporting mold growth deep within the material. You need to identify porous materials quickly because they drive moisture retention and hidden contamination. Focus on items that absorb, hold, or wick water.
Inspect carpet, padding, and upholstery.
Check insulation, paper-backed products, and ceiling tiles.
Review particleboard, fiberboard, and untreated wood.
Look for textiles, books, and acoustic panels.
If a material stayed wet, expect mold risk even when the surface looks dry. Mark these items for removal, bag them, and keep your workspace organized.
When you act fast, you protect your team and keep the area safer for everyone. Clear identification now helps you make confident cleanup decisions later.
Remove Damaged Drywall
Cut out and remove damaged drywall as soon as possible because it’s porous and can hold moisture and mold behind the surface. You’ll limit hidden growth when you complete a careful moisture assessment first and mark every compromised section.
Use drywall removal to cut at least 12 inches beyond visible staining or soft spots, then bag debris immediately. Keep cuts clean, support nearby edges, and avoid disturbing dust more than needed.
If the wall feels cool, damp, or swollen, treat it as suspect until it dries and passes inspection. You’re protecting your space and helping everyone in it stay healthier.
After removal, leave the cavity open so you can confirm the area is truly dry before you move on.
Replace Contaminated Insulation
Once the drywall is out, inspect the insulation behind it because fiberglass, cellulose, and foam can trap moisture and support hidden mold growth. You’ll protect your home and your crew when you treat wet insulation as contaminated material. Replace any saturated section instead of drying it in place.
- Match the removal method to the insulation types present.
- Bag and discard porous debris that can’t be cleaned.
- Check nearby framing, sheathing, and moisture barriers for damage.
- Install new insulation only after the cavity reads dry.
Use gloves, a respirator, and sealed waste bags. If you leave contaminated insulation in place, you keep spores, odors, and dampness in the wall.
Clean and Disinfect Mold-Prone Surfaces
After moisture damage, you should clean and disinfect all mold-prone surfaces as soon as they’re dry enough to handle safely.
Use detergent and water first to remove residue, then apply approved disinfectants with correct dwell time. Focus on hard, nonporous areas such as tile, metal, sealed wood, and plastic, because these surfaces support mold less than porous materials.
Wear gloves, eye protection, and a respirator if airborne particles may linger. Keep your work area ventilated and change cloths often to avoid spreading contamination.
These mold prevention strategies help you regain control fast and keep your space healthy for everyone in it. Consistent disinfecting techniques reduce re-growth, protect shared rooms, and support a clean, confident recovery after water damage.
Spot Hidden Mold After Water Damage
Even when surfaces look dry, you should check for hidden mold in wall cavities, under flooring, behind baseboards, inside cabinets, and around HVAC components.
You’ll often spot it by musty odor, discoloration, warped materials, or recurring dampness after the leak stops. During a mold inspection, focus on areas that stayed wet longer than 24 hours and on rooms with poor airflow.
Trust your team: shared attention catches problems early.
- Inspect edges where water pooled.
- Note staining, swelling, or peeling.
- Probe soft drywall or wood.
- Document findings with photos and dates.
If you see hidden mold, treat it as a moisture indicator, not just a stain. Acting quickly helps you protect your space and stay part of a healthier home environment.
Prevent Mold After Repairs
To prevent mold after repairs, make sure every wet material is fully removed, dried, and replaced before you close walls or reinstall finishes.
You’ll protect your space when you use mold prevention techniques that keep surfaces clean, gaps sealed, and airflow steady. Inspect framing, subfloors, and insulation for leftover dampness, then confirm they’re dry with a meter before finishing.
Use moisture control methods like exhaust fans, dehumidifiers, and proper grading to keep humidity low. Repair leaks fast, caulk penetrations, and maintain HVAC filters so condensation doesn’t return.
After you finish, check the area regularly for musty odors, stains, or soft spots. If you stay consistent, you and your home can recover with confidence and stay healthier together.
When to Call a Mold Cleanup Pro
If the damage goes beyond a small, contained area, you should call a mold cleanup pro before you disturb more materials or close anything back up.
You’ll protect your space and your team by acting fast when cleanup signs appear. Call a pro if you notice:
- Visible growth on drywall, framing, or insulation.
- A musty odor that stays after drying.
- Water sat longer than 24 to 48 hours.
- You have mold health concerns, allergies, or asthma.
A pro can test, contain, remove, and dry materials with proper equipment.
If you keep working in the area, you may spread spores into clean rooms and delay safe recovery.
Trust the signs, document conditions, and choose help early. That’s how you stay aligned with your home’s safety.
Frequently Asked Questions
Can Mold Cause Health Problems Before Visible Growth Appears?
Yes—you can experience health risks before visible mold appears. Use mold detection methods like air sampling and moisture meters, since hidden growth can release spores early. You’re not overreacting; quick testing protects your health.
Does Insurance Cover Mold Prevention After Water Damage?
Usually, you’ll need to check your insurance policies; mold coverage often depends on the water-damage cause and your policy limits. You can’t assume prevention is covered, so document damage, act fast, and ask your insurer.
What Household Tools Help Monitor Indoor Humidity Levels?
You can use humidity monitors and moisture sensors to track indoor levels accurately. Place them in rooms, check readings daily, and compare trends. You’re helping your home stay comfortable, safe, and in control.
How Often Should HVAC Systems Be Inspected After Flooding?
Inspect your HVAC system immediately after flooding, then again within 30 days, and during HVAC maintenance every 3 to 6 months. During flood recovery, you’ll protect your home, your crew, and your indoor air together.
Are Some Building Materials Naturally Mold-Resistant?
Yes—some building materials naturally resist mold, like a fortress against decay. You can choose mold resistant materials and smart building material options, such as metal, concrete, and treated wood, to reduce moisture-driven growth and protect your space.
Wrap-Up
Mold can seem small at first, but after moisture damage, it can spread fast and become a major problem. You need to act quickly: stop the water, dry materials fully, and remove anything porous that stays wet. You also need to check hidden spaces and clean affected surfaces. Fast repair now means less damage later, better air quality, and fewer health risks. If the area is large or uncertain, call a mold cleanup pro. Taking these steps to prevent mold after moisture damage protects your home, your health, and your wallet.